


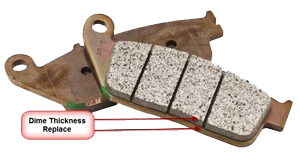
 The groove disappears when the brake pad is worn enough to the point of needing to get the motorcycle parts replaced. Once the pad is down to roughly 3 millimeters, you need to replace it.


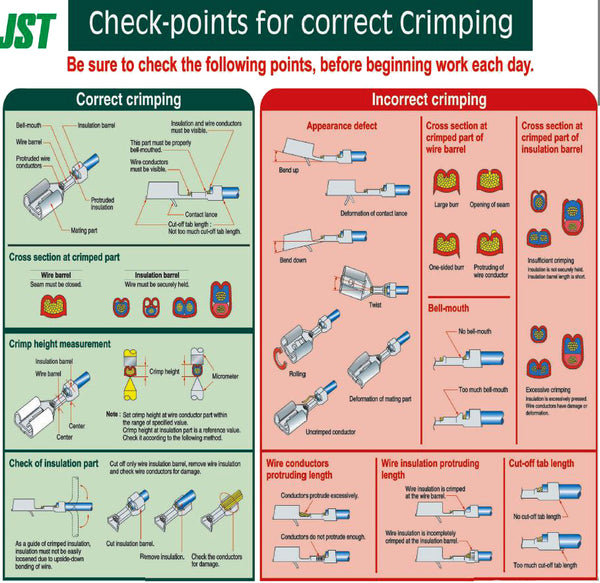
On one side you’ll find those who will quickly crimp a connection without giving it a second thought and go on with their day. On the other side you’ll find those more than happy to call the first group “hacks” or lazy. They will insist that a soldered connection is much more reliable and has better performance. But who is right? The truth of the matter isn’t that simple. This won’t settle the crimp or solder discussion, but it will provide valuable insight.

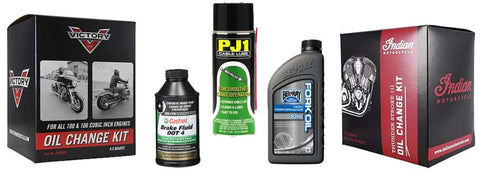
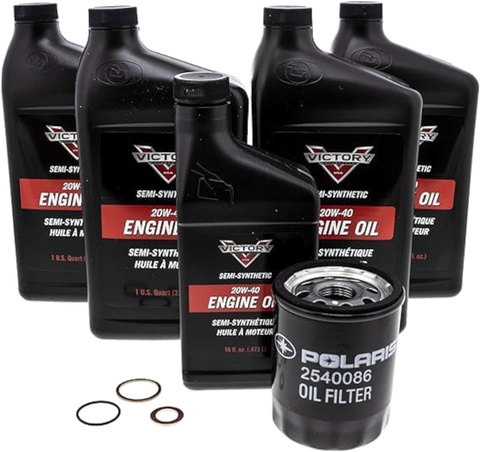
Regular maintenance is essential for keeping your Victory motorcycle in optimal condition. One of the key aspects of maintenance is changing the oil. The frequency at which you should change the oil in your Victory motorcycle depends on several factors, including the model of your bike, how you ride it, and the type of oil you use. As a general guideline, Victory motorcycles typically require an oil change every 3,000 to 5,000 miles.
Riding under severe conditions:
If you ride your Victory motorcycle under severe conditions, such as frequent short trips, stop-and-go traffic, or high-speed riding, you may need to change the oil more frequently. Severe conditions can cause the oil to break down more quickly, leading to decreased lubrication and potential engine damage. Additionally, if you frequently ride in dusty or dirty environments, you may need to change the oil more often to prevent contamination.
Riding under normal conditions:
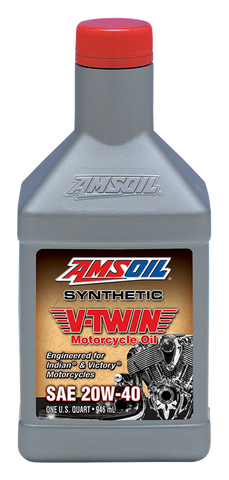
However, if you ride your Victory motorcycle under normal conditions and use high-quality oil, you may be able to extend the interval between oil changes to 5,000 miles or more. Klotz oil is designed to last longer and provide better protection for your engine, making it a popular choice among Victory motorcycle owners.
It's important to refer to your Victory motorcycle's owner's manual for specific guidelines on oil change intervals. The manual will provide recommendations based on the model of your bike and the type of oil it requires. Following the manufacturer's guidelines will help ensure your Victory motorcycle continues to perform at its best and remains in good condition.
TIP: It's much easier to change your oil when your engine is a little warm, so plan to get started after the engine has been running. Some service manuals will tell you to warm the bike up to “operating temperature“ meaning you need to ride it for 30 minutes before changing the oil.
Is it Better to Change Motorcycle Oil Before or After Storage?

Storing your Victory motorcycle properly is essential for preventing damage and maintaining its performance. When it comes to changing the oil before or after storage, opinions may vary among motorcycle enthusiasts. However, the general consensus is that it's best to change the oil before storing your Victory motorcycle for an extended period.
Changing the oil before storage has several benefits:
- Fresh Oil: By changing the oil before storing your Victory motorcycle, you ensure that fresh, clean oil is in the engine. This is important because old oil can break down over time, leaving deposits and contaminants that can harm your engine.
- Protection: Fresh oil provides better protection for your engine while it's in storage. It creates a barrier against moisture and contaminants, helping to prevent corrosion and other damage.
- Prevent Contamination: Changing the oil before storage removes any contaminants. Engine operation produces combustion byproducts, such as moisture and acids. Those harmful byproducts can cause problems if they're left in your engine during storage. Moisture can lead to rust formation on engine parts.
- Peace of Mind: Changing the oil before storage gives you peace of mind knowing that your Victory motorcycle is properly maintained and ready for storage. It's one less thing to worry about when you're storing your bike for an extended period.
While changing the oil before storage is recommended, some riders also choose to change the oil after storage. This can be done to remove any contaminants that may have accumulated in the engine during storage and ensure that the oil is fresh before riding again. Ultimately, the decision of whether to change the oil before or after storage comes down to personal preference and the specific conditions of your Victory motorcycle.
What Oil Can I Use in My Victory Motorcycle?


Choosing the right oil for your Victory motorcycle is crucial for maintaining its performance and longevity. Victory motorcycles are designed to work best with high-quality motorcycle-specific oils that meet the manufacturer's specifications. When selecting oil for your Victory motorcycle, consider the following factors:
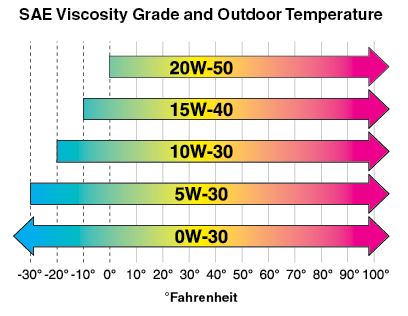
1. Viscosity: The viscosity of the oil determines how well it flows at different temperatures. Victory motorcycles typically require oil with a specific viscosity range that is suitable for the engine and climate conditions. You can find the recommended viscosity range in your Victory motorcycle's owner's manual.
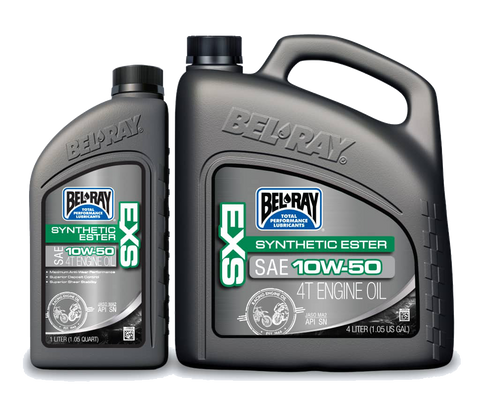
2. JASO Rating: JASO stands for Japanese Automotive Standards Organization, which sets the standards for motorcycle oil quality. Victory motorcycles require oil that meets specific JASO ratings to ensure optimal performance and protection for the engine. Look for oils with JASO MA or MA2 ratings when choosing oil for your Victory motorcycle.
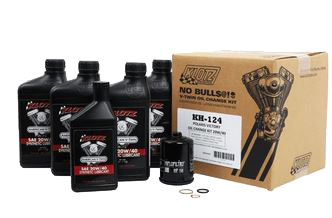
3. Brand Recommendations: Unlike Harley, Victory motorcycles have a wet style clutch. This means the engine oil is also part of the clutch and transmission. Using the wrong type or brand WILL DAMAGE your clutch. No matter what everyone on Facebook says about using cheap oils to "save money" don't do it!
4.Change Interval: Consider the recommended oil change intervals for your Victory motorcycle when selecting oil. Choosing a high-quality oil that lasts longer between changes can save you time and money on maintenance.
TIP: Adding a magnetic drain plug, a magnetic dipstick or a reusable oil filter can and will help protect your engine. Witchdoctors stocks all these popular accessories. They are all easy to install too!
It's essential to use the right oil for your Victory motorcycle to ensure proper lubrication, cooling, and overall engine performance. Using the wrong type of oil or neglecting oil changes can lead to premature engine wear, poor performance, and potential long-term damage. Regularly check your oil level and quality to ensure your Victory motorcycle continues to run smoothly. View oils and kits here.
What is JASO Rating?

The JASO rating is a standard set by the Japanese Automotive Standards Organization for motorcycle engine oils. The JASO rating helps motorcycle owners determine the quality and suitability of an oil for their bikes. Victory motorcycles, like many other motorcycle brands, require oil that meets specific JASO ratings to ensure optimal performance and protection for the engine.
There are several categories of JASO ratings, but the two main ratings that are relevant to Victory motorcycles are JASO MA and JASO MA2:
1. JASO MA: This rating is for oils that are suitable for wet-clutch motorcycles. Victory motorcycles with wet clutches require oil with a JASO MA rating to ensure proper friction performance and durability of the clutch system.
2. JASO MA2: This rating is an updated standard that provides improved performance and compatibility with catalytic converters. Victory motorcycles that have catalytic converters or emission controls may require oil with a JASO MA2 rating to meet environmental standards and maintain engine performance.
When choosing oil for your Victory motorcycle, look for products that display a JASO MA or MA2 rating on the label. This indicates that the oil meets the quality standards set by the JASO. It is suitable for motorcycle engines, especially those with wet clutches. Using oil with the correct JASO rating can help prevent clutch slippage, maintain proper lubrication, and protect your Victory motorcycle's engine over the long term. Failure to do so can and usually does create clutch slippage.
In Conclusion:
In conclusion, regular oil changes are essential for maintaining the performance and longevity of your Victory motorcycle. Follow the manufacturer's recommendations for oil change intervals. Choose high-quality oil that meets JASO ratings. Consider changing the oil before storing your bike for extended periods. By taking care of your Victory motorcycle's oil needs, you can ensure smooth, reliable performance on the road for years to come.
Ride Safe!
]]>